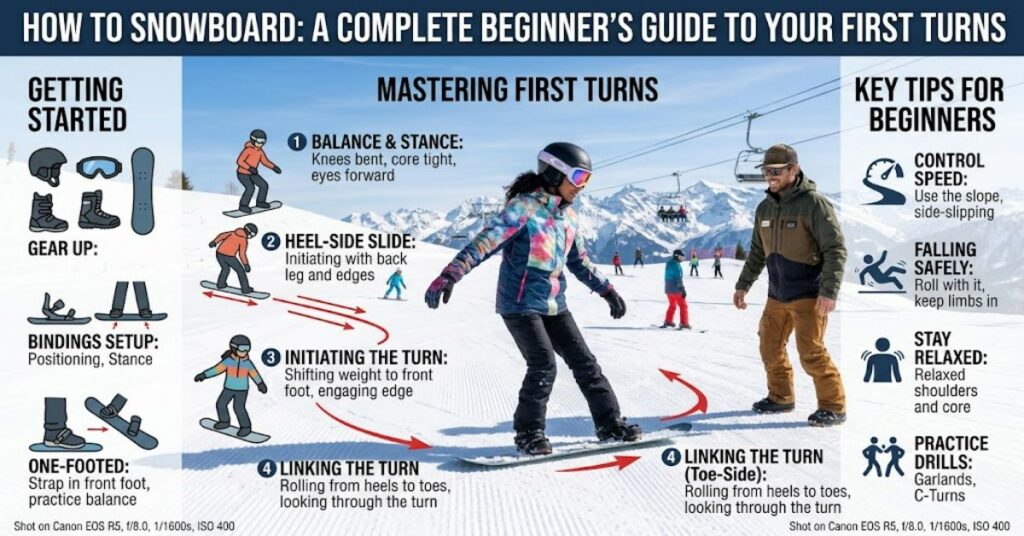
If you are wondering how to snowboard, the best approach is to learn the fundamentals in a logical order rather than trying to ride quickly on your first day. Start by determining whether a regular or goofy stance feels natural. Regular riders place their left foot forward, while goofy riders place their right foot forward. After that, learn to move with one foot attached, practise skating and gliding on gentle terrain, and begin working on heel-side and toe-side edge control.
Snowboarding can feel strange at first because both feet eventually remain attached to the same board. Your balance, ankle movements and body position all influence how the board travels. Small changes can produce surprisingly large results, particularly when you are learning to control speed.
The first objective should not be reaching the bottom of a difficult slope. It should be learning how to stop, slow down and change direction intentionally. Once those skills become reliable, linked turns become much easier.
A sensible beginner progression usually moves from stance and equipment awareness to skating, straight gliding, edge control, J-turns, traversing and linked turns. Each stage introduces a movement that becomes useful during the next stage.
Professional instruction can also shorten the learning curve. A qualified instructor can help with stance, equipment setup, body position and terrain selection while correcting mistakes before they become habits.
The following guide explains each stage in practical terms, including common beginner errors, equipment considerations, safety and ways to decide when you are ready for more challenging terrain.
Choosing Your Snowboard Stance
The first decision is identifying which foot should lead.
A regular stance means your left foot is positioned towards the front of the snowboard. A goofy stance means your right foot leads.
Neither stance is superior. The correct stance is the one that gives you the most natural sense of balance and control.
Some beginners discover their preferred stance by thinking about which foot they naturally place forward when sliding across a smooth surface. Others find it through simple balance exercises.
Do not become overly concerned about choosing perfectly on your first attempt. Your instructor can help you test both positions if you remain uncertain.
Your basic riding position should be relaxed. Keep your knees slightly bent, avoid locking your legs and maintain a comfortable athletic posture. A rigid stance makes it harder to absorb bumps and adjust your balance.
Regular vs Goofy
| Stance | Leading Foot | What It Means |
| Regular | Left foot | Left side faces the direction of travel |
| Goofy | Right foot | Right side faces the direction of travel |
Your stance is simply a preference in board orientation. It does not determine whether you will become a good or bad snowboarder.
Understand Your Snowboard Equipment
Before heading down a slope, become familiar with the basic parts of your equipment.
The snowboard has a nose and tail, while the long edges are divided into the heel-side and toe-side edges. Bindings secure your boots to the board and transfer your movements into the snowboard.
Boot fit is particularly important. Your boots should hold your feet securely without creating excessive pressure or pain. Loose boots can make control difficult, while boots that are excessively tight can become uncomfortable during a long session.
Beginners should also make sure the bindings are correctly adjusted. A snowboard shop or instructor can help confirm that the stance width and binding angles are appropriate.
The goal is not to create a highly technical setup. It is to create a comfortable platform that responds predictably to your movements.
How to Skate With One Foot Attached
Skating is one of the first practical skills beginners need.
When moving across flat snow, your front foot is usually secured in its binding while your back foot remains free. Use the free foot to push against the snow, much like pushing a skateboard.
Start with short pushes. Keep the movement controlled and avoid trying to cover long distances immediately.
Once you have enough momentum, place your free foot against the board near the rear binding for additional stability.
Skating is important because you will use it around lift queues, flat sections and loading areas. It may seem less exciting than turning, but it becomes part of normal mountain riding.
Why Beginners Struggle With Skating
New riders sometimes place too much weight on the free foot or attempt large pushing movements.
Keep your centre of gravity low and your movements compact. Focus on maintaining balance while the board moves underneath you.
The objective is not speed. It is control.
Practise Straight Gliding
After becoming comfortable with skating, move to a very gentle slope and practise gliding.
Secure your front foot and allow the board to travel straight on suitable terrain. Keep your knees slightly bent and maintain a relaxed upper body.
This exercise teaches you how the snowboard feels when it moves over snow.
Do not immediately try to make sharp turns. Instead, learn to recognise how small movements influence the board.
| Learning Stage | Main Skill | Goal |
| Stance | Body alignment | Find a natural riding position |
| Skating | One-foot movement | Move confidently on flat terrain |
| Gliding | Balance | Ride straight with control |
| J-turn | Direction change | Complete a controlled turn |
| Traversing | Edge control | Travel across the slope |
| Linked turns | Continuous movement | Connect turns smoothly |
This progression helps prevent beginners from attempting movements before they understand the basic mechanics.
Master Heel-Side and Toe-Side Edges
Edge control is one of the most important parts of snowboarding.
Your board has two primary working edges. The heel-side edge sits underneath your heels, while the toe-side edge sits underneath your toes.
When you apply pressure to an edge, the board interacts differently with the snow. Learning to manage that pressure allows you to control direction and speed.
On your heel side, you will gradually learn to apply pressure through your heels while maintaining a stable knee bend.
On your toe side, you shift pressure towards your toes while keeping your body balanced over the board.
Avoid making exaggerated movements. Good edge control often comes from small adjustments rather than dramatic shifts.
Why Edge Control Comes Before Speed
A beginner who can slow down and stop deliberately has developed a much stronger foundation than someone who can simply travel quickly.
Speed increases the consequences of mistakes. Edge control gives you a method for managing those mistakes.
A useful beginner principle is simple:
Do not increase your speed until you can control it.
That rule remains useful even as your riding improves.
Learn the J-Turn
The J-turn is a fundamental exercise because it teaches you how to move from a straight glide into a controlled direction change.
Start on gentle terrain. Glide for a short distance and then gradually engage one edge so the board curves across the slope.
The board should eventually travel across the hill rather than continuing directly downhill.
Practise the movement on both sides.
A heel-side J-turn develops control through your heels, while a toe-side J-turn teaches you how to engage the opposite edge.
The movement should be smooth. Avoid twisting your shoulders aggressively to force the board around.
Instead, concentrate on balanced movement through your ankles, knees and hips.
Learn to Traverse
Once you can perform controlled J-turns, begin practising traverses.
A traverse involves travelling across the slope rather than directly down it. Your board remains angled across the fall line while an edge helps control your movement.
This skill is extremely useful because it teaches you that you do not have to point your snowboard straight downhill.
You can regulate your speed by changing the angle of your board relative to the slope.
Heel-side traversing requires controlled pressure through your heels. Toe-side traversing uses the opposite edge.
Keep your movements small and consistent. Sudden weight shifts can make the board react faster than expected.
How to Make Your First Linked Turns
Once individual turns become comfortable, you can start connecting them.
The basic sequence is:
- Complete one turn across the slope.
- Gradually reduce pressure on the current edge.
- Allow the board to move towards the fall line.
- Begin engaging the opposite edge.
- Shape the new turn.
- Repeat the movement in the other direction.
At first, make wide turns.
Wide turns provide more time to manage your speed and balance. As your confidence improves, you can gradually make your turns tighter and more efficient.
Do not worry about producing perfect tracks in the snow. Your first objective is consistency.
If you can complete several turns while remaining in control of your speed, you are making meaningful progress.
How to Control Speed
Many beginners assume speed can only be controlled by stopping.
Turning is actually one of your most useful speed-management tools.
When your board travels across the slope, you generally reduce the amount of direct downhill movement. By shaping your turns, you can manage how quickly you descend.
Edge pressure also influences speed. A stronger edge engagement can provide more control, while a flatter board generally allows greater freedom of movement.
This is why beginners should practise complete turns rather than simply learning to brake.
Good snowboarding is not about constantly stopping. It is about controlling the amount of speed you have.
Common Beginner Snowboarding Mistakes
Looking Constantly at Your Feet
Watching your board all the time can make your balance less natural. Look towards the direction you want to travel.
Keeping Your Legs Straight
Locked knees make it harder to absorb changes in terrain. Maintain a relaxed bend in your knees and ankles.
Using Your Shoulders to Force Turns
Large upper-body rotations can make your movements unpredictable. Focus on controlled movements from the lower body.
Going Down Steep Terrain Too Early
Steeper slopes increase speed and reduce the amount of time available to correct mistakes. Learn your fundamentals on gentle terrain first.
Ignoring the Toe Edge
Some beginners become comfortable on their heels and avoid the toe edge. This creates an uneven skill set and makes linked turns harder.
Stopping in Unsafe Locations
Avoid sitting in the centre of a busy run or below jumps where approaching riders may not see you. Move to a visible location at the side of the trail when stopping.
Beginner Snowboarding Equipment
You do not need the most expensive equipment to learn.
The priority should be appropriate sizing, good fit and reliable performance.
| Equipment | Priority | Reason |
| Snowboard | High | Needs to suit your size and ability |
| Boots | Very high | Directly affect comfort and control |
| Bindings | Very high | Transfer movement to the board |
| Helmet | Essential | Helps protect your head |
| Goggles | High | Improve visibility and protect your eyes |
| Gloves | High | Protect hands from cold and snow |
| Waterproof clothing | High | Helps maintain warmth and comfort |
| Wrist protection | Useful | May be helpful during frequent beginner falls |
Boots deserve particular attention. If your boots are uncomfortable or poorly fitted, even a well-chosen snowboard will be difficult to control.
Renting equipment can be a practical option for beginners who are still deciding whether they want to continue with the sport.
Should You Take a Snowboarding Lesson?
For a complete beginner, professional instruction can be extremely useful.
An instructor can demonstrate correct body position, explain edge control and select terrain appropriate for your current ability.
Lessons can also help with practical mountain skills such as using lifts and understanding trail signs.
Independent practice still has an important role. A productive approach is to learn a skill during a lesson and then repeat it deliberately afterwards.
The objective is to understand why a movement works rather than simply copying it.
Snowboarding Safety for Beginners
Snowboarding takes place in an environment where conditions can change quickly.
Before riding, check the weather and snow conditions and choose terrain appropriate to your experience. Poor visibility, icy surfaces, heavy snowfall and crowded slopes can all increase difficulty.
Basic safety practices include:
- Wear a properly fitted helmet.
- Stay on terrain suited to your ability.
- Follow posted signs and resort instructions.
- Look uphill before entering or crossing a route.
- Stop in visible areas.
- Avoid stopping underneath jumps or in narrow sections.
- Never enter closed terrain.
- Be aware of other riders.
- Learn lift procedures before entering busy lift areas.
- Avoid riding alone when exploring unfamiliar or hazardous terrain.
Safety should not be treated as something you learn after mastering the board. It should form part of your riding technique from the beginning.
When Are You Ready for Steeper Slopes?
There is no fixed number of hours that makes someone ready for more difficult terrain.
Instead, assess your actual skills.
You should ideally be able to:
- Stop deliberately on both edges.
- Link turns in both directions.
- Control speed without panic.
- Traverse comfortably.
- Recover from small balance mistakes.
- Choose a sensible line.
- Understand basic slope etiquette.
- Get back up after a normal fall.
- Maintain control on your current terrain.
If these abilities are inconsistent on an easy slope, moving to a steeper run is unlikely to solve the problem.
It will usually make the same weakness harder to manage.
One of the most useful progression rules is therefore to let skill determine terrain, rather than allowing confidence alone to determine where you ride.
Three Practical Insights Beginners Often Miss
Flat Terrain Can Be Surprisingly Difficult
Beginners often focus entirely on slopes and underestimate flat sections. However, areas around lifts and resort bases can require frequent skating and balance adjustments.
Practising one-foot movement early can therefore make the entire mountain experience easier.
Turn Shape Is a Form of Speed Control
New riders often concentrate on braking. But learning to shape turns across the slope provides a more continuous method of managing speed.
This becomes increasingly important as terrain becomes steeper.
Equipment Fit Can Affect Learning More Than Price
A more expensive snowboard does not automatically make learning easier. Poorly fitting boots or incorrectly adjusted bindings can create unnecessary difficulty.
For beginners, equipment compatibility and fit are usually more important than chasing advanced specifications.
The Future of Snowboarding in 2027
Snowboarding in 2027 will continue to be influenced by changes in winter conditions, resort infrastructure, equipment technology and participation patterns.
The wider ski industry has increasingly focused on sustainability and operational resilience as resorts deal with changing weather conditions. Snowmaking technology, water management and energy use are likely to remain important operational issues.
For riders, this means snow conditions may increasingly vary between destinations and throughout a season. A beginner may encounter packed snow, soft powder, icy surfaces or machine-made snow during the same season.
That makes fundamental technique particularly valuable.
A rider who understands balance, edge pressure and turn shape can adapt more effectively than someone who has only practised on one type of snow.
Technology will also continue to influence equipment. Board construction, boot materials, binding systems and protective equipment are likely to become progressively lighter and more specialised, although improvements in equipment cannot replace good technique.
The direction of participation is less certain. Resort access, travel costs, snow reliability and lesson prices can all influence whether new participants enter the sport.
For 2027, the most realistic expectation is not a radical change in how beginners learn. The fundamentals will remain the same: balance, edge control, speed management and progressive terrain selection.
Takeaways
- Start with stance and balance: Your first goal is a stable, relaxed riding position.
- Practise skating: One-foot movement is essential for flat areas and lift zones.
- Learn both edges: Heel-side and toe-side control are equally important.
- Use J-turns: They provide a manageable introduction to changing direction.
- Shape your turns: Turn direction can help regulate speed without constant stopping.
- Choose terrain carefully: Your ability to control the board should determine where you ride.
- Prioritise fit over price: Comfortable boots and correctly adjusted bindings can make learning easier.
Conclusion
Learning how to snowboard is a gradual process built around balance, edge control and repetition. You do not need to master difficult terrain or achieve high speeds to make meaningful progress. The most valuable early skills are much simpler: choosing a comfortable stance, skating with one foot attached, gliding, controlling both edges and completing deliberate turns.
The progression from J-turns to traverses and linked turns gives beginners a practical framework for developing control. Each stage builds on the previous one, making the learning process more manageable.
Equipment also plays an important role. A properly fitted boot, suitable snowboard, correctly adjusted bindings and appropriate protective gear can remove unnecessary obstacles from the learning process.
Most importantly, beginners should allow skill to determine progression. A controlled rider on gentle terrain is developing a stronger foundation than a nervous rider attempting a difficult slope.
With patience, appropriate instruction and consistent practice, the movements that initially feel unfamiliar can become increasingly natural.
Frequently Asked Questions
How long does it take to learn how to snowboard?
There is no fixed timeframe because progress depends on fitness, balance, previous board-sport experience, instruction and snow conditions. Many beginners can learn basic gliding and turning during their first few sessions.
Is snowboarding difficult for beginners?
The first few hours can be challenging because the rider must balance on a sideways board while controlling its edges. However, learning becomes easier when skills are introduced progressively rather than attempting difficult terrain immediately.
How do I know if I am regular or goofy?
Regular means your left foot leads, while goofy means your right foot leads. You can test both positions on safe, flat terrain and choose the stance that feels more natural and stable.
What should you learn first when snowboarding?
Begin with stance and balance, followed by skating, gliding and basic edge control. J-turns and traversing should come before attempting continuous linked turns.
How do you stop on a snowboard?
To stop, turn the snowboard across the slope and apply controlled pressure to the appropriate edge. Beginners should practise stopping on both heel and toe edges on gentle terrain.
Do I need lessons to learn snowboarding?
You can practise independently, but professional lessons are highly useful for beginners. An instructor can correct body position, explain edge control and help you choose terrain appropriate to your ability.
What equipment does a beginner snowboarder need?
A beginner needs a suitable snowboard, compatible bindings, properly fitted boots, a helmet, goggles, gloves and waterproof clothing. Additional protective equipment can also be useful.
Methodology
This article was prepared as an instructional synthesis using established beginner snowboarding guidance and current winter-sports safety information. The progression from stance and skating through gliding, edge control, J-turns, traversing and linked turns reflects commonly used beginner teaching principles.
Safety recommendations were considered alongside established resort and winter-sports guidance covering protective equipment, slope awareness, terrain selection and responsible riding behaviour.
No firsthand snowboarding test was conducted for this article, so the article does not claim personal field experience. Practical recommendations are presented as general beginner guidance rather than as a substitute for professional instruction.
Individual learning speeds vary. Fitness, previous experience, equipment, snow conditions, weather, terrain and instructor quality can all affect progress. The suggested sequence should therefore be treated as a flexible framework rather than a guaranteed timetable.
The article also avoids presenting equipment or technology as a replacement for technique. Good-fitting boots, appropriate bindings and a suitable board can support learning, but fundamental balance and edge control remain central.
Editorial disclosure: This article was drafted with AI assistance and should be reviewed by a human editor before publication. Technical claims, safety recommendations, dates and references should be independently verified against original sources.
References
National Ski Areas Association. (2025). Industry statistics and safety information. National Ski Areas Association.
REI Co-op. (2025). How to snowboard. REI Expert Advice.
REI Co-op. (2025). Snowboarding with kids. REI Expert Advice.